Sunday, January 31, 2016

Sabbath Congratulations

Congratulations

While some of you were celebrating a hand-made wedding and enjoying its home-cooked food yesterday -

All God's Blessings to the newly-weds

- others of us were creatively moving water.

This was at a construction site, not our house - for which we give thanks..

Scenes seen

Yesterday in Appenzell

Very early Periwinkle/ Vinca minor/ SingrĂ¼eni
The view of the valleys
Appenzell's "coat of arms"

from the hills

Today is Sabbath rest, so further art exercises will come later.
We are looking forward to pictures from the wedding (wherever you put them - please let us know).


Friday, January 29, 2016

Beginnings

First Practice Work

Mary sent this of her beginning work. Note the lovely curved lines and soft flow.
This makes me happy, Mary.

Copy of a drawing in a previous post.


Wedding Blessings

To all those involved with the Wedding today, God's fullest Blessings.

I will be gone all day, so further drawing exercises will be another day.

Drawing Faces, Part Two

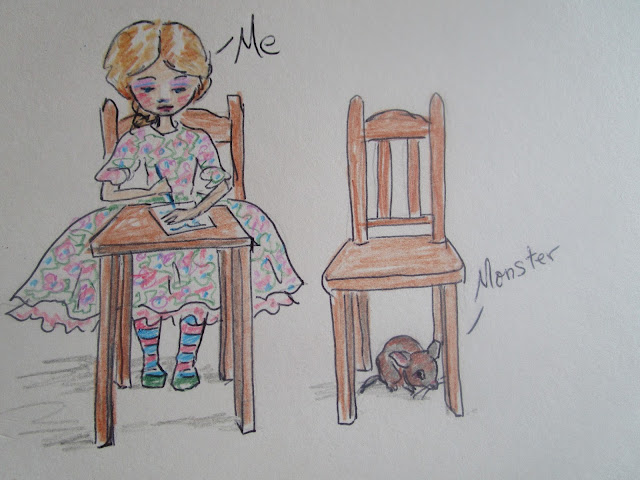
Slay me a Dragon

Little Miss Muffet
Sat on her tuffet
Calmly writing away.

Along came a spider - no, a mouse
And sat down beside her,
And she didn't know it.....


Until she finished and got up and saw something on the floor, and was about to pick it up --
Miss Muffet doesn't have very good eyes --
And realized  the ball was furry....

Stefan!!! Come here!
Put a pan over it!

He did.
Then Miss Muffet called Saint George,
"Please, Slay the dragon!"
He gallantly galloped home from the construction site in the City and slew the monster. Miss Muffet is glad she married him.

We have not had a mouse in the house for years, but a couple of days ago the haulers of wood left the side room door open, and Mom neglected to do her nightly rounds of door checks, so in the night in crept the intruder. Too bad for it.

Drawing Faces, Exercise Two

Some people like scribbles, some don't. It feels disorderly to them. They like one line at time. So, to keep trauma to a minimum, this exercise is for them; but everyone should try it - even I did it. It was trauma to me: "Only one line?! That isn't enough. The first line is for warm up. The second is for practice, and the third is maybe where you want it." Well, I did it anyway.

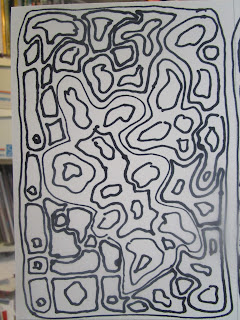
So this time we try doing single-line shapes.

Gather your mark-maker, with no eraser! - so make that drawing implement a black marker that makes lines  that stay down where you put them - and paper, and carbon/graphite/tracing paper, and colored pencils.

Resources: a large face picture from a magazine advertisement, preferably with some shadows.


Process: will be in several steps.
1. On a sheet of paper, draw a closed curve-line shape in each quarter. Then make more around it. Don't fill them in and don't get too detailed. Repeat. Repeat. Repeat. Set these papers aside for a bit.

Closed line shapes
Filling the space (upper left above) with more shapes
Another space (lower right of above ) with shapes

2. Trace the face from your magazine onto your paper, using single black lines around all the features and areas of shadow and highlights. It will look something like a map when you are done. (You may need to do it in pencil first if you are using graphite paper, then trace over with marker.)


3. On your first set of drawings, fill in the bigger shapes with smaller closed-line shapes, at first randomly, then more decoratively. Don't try to make a recognizable picture.

Same shapes (above), with detail added

Details added

Details on lower left form

4. Make copies of your face drawing. Organize four or five colored pencils (not skin tones!) according to value (lightest to darkest).
On the first one,  color each shape according to the approximate value you see in the photo. Don't shade; only flat color.

Flat color  
On the second one, use one color (or your marker) and  make marks like dots, cross hatching, squiggles, and stripes to indicate value. The closer together the marks are the darker will be the value.

Varied marks for value
On the third, fourth and fifth ones have fun and make pretty Zentangle fillings in the spaces to indicate value with more or less lines filling the area.

Resource picture

Drawing with value area marks

Main lines in thick lines

Detail lines in thinner lines
All Tangled

Goal: To make control people happy and annoy scribblers. No, no. For equality and world peace. No, no, no. Actually it is to make you think with your brain. Some people do that; others of us think - when drawing - mostly with our hands. Ultimately, what you want to achieve is a happy balance between brain and hand. Meaning, scribblers should find their lines getting very close together, indicating the brain is ruling the hand, but the hand is still free to play. For single-line people, they will find that their lines are not so tense and rigid, but can be floating and even wobbly without collapsing the universe (i.e. - needing to be erased and done over).

Most experienced drawers of faces will use this technique of outlining areas of lights and darks all the time that they intend to make a shaded drawing, and sometimes even when they don't, just to physically indicate the contours of the planes of the face (which, for a simple drawing, will mostly get erased afterward).

So this is a very necessary skill to learn: first note the shape of a value, then mark your paper. Brain and hand coordination.

Thursday, January 28, 2016

Scene Seen

 Oooops!! Over lap.
As soon as I posted this I saw that Pam had just posted one. Skip this one here and go see hers first!


Clarification

Yesterday's post seems to have been unclear. In no way was I saying that all kinds of things that anybody wishes to call art are equally as valid or worthwhile as anything else. Many things that some people call art are certainly not: pornographic images, thrown together trashy stuff, some handicrafts (that while technically fine, are not per se art). Other things might be art, but are bad art, not just "I don't like it," but bad in the sense that it fulfills neither the "good," the beautiful," or the "true" qualifications to be worthwhile.


That being said, many kinds of artistic expression are still valid, even if some people prefer other kinds. Mostly what I was referring to was whether decorative arts can be called art. Yes, they can.

Personally, I love fine figurative sculpture, but I also love dolls. Really. I like simple ones and highly refined ones (but not run-of-the-mill mass produced ones). I see no reason not call refined doll making as much an art as classical figure sculpture.

Wow. A "proper" sculpture, by Phillipe Faraut

Also Wow, in a more fantasy style, same sculptor

Wow. A doll with setting, by Natalie Ruiz

Wow again, a doll, by Ankie Daanen
Likewise decorative faces can be (but aren't always) a form of art as much as realistic portraiture. Each has its place. And in terms of techniques and materials - over which many people can get quite snooty - no one style or medium can be said to be inherently better than another. True, some will certainly fetch more on the market (compare oil paintings to watercolor or pencil works in price), but that does not make them "better." The same goes for scribble lines versus single lines, for carefully blended colors versus patched colors, for collage/stencils/stamping versus wholly drawn images. Each can be artistic in its place.

Seen Today - and Yesterday

The views were lovely, so I want to show you. (Much lovelier than my camera saw...)

Retta looking for a stick
Glarner Alps from the base of the Albis

More Glarner Alps

That is the ZĂ¼richsee in the distance

Town and country, Lake ZĂ¼rich in the background

The Esel wanted to eat where the Schaf was lying

Schwartze Schafe


A separate post will cover the next Face Drawing exercise.

The Final Countdown

Sorry to interrupt what will surely be a wonderful series of art lessons from Sarah but I have been intending to give an update of creative wedding endeavors around here. The wedding is two days away. Tomorrow the blitz begins and I will not be able to do anything else until next week. Here are just a few glimpses of what we've been doing.


Much food preparations were done in advance with items then frozen. They will be thawed and finished in the next two days. These were little hand pie appetizers, appropriate because the bride, my daughter, has been my main hand pie making helper for many years. We simply had to have them on the menu. These little bites were filled with roasted cauliflower, hazelnuts, garlic, rosemary and Manchego cheese.


We ended up making 300 of them!


Last weekend the groom came to visit his betrothed. At the time he arrived we were occupying the little boys with simple water color sets. He joined in the fun. These little boys are going to escort the three flower girls in the wedding (yes, three!) I can't wait to see how adorable the little couples will be in their wedding finery. The groom's name is Andrew and so is my grandson in the middle. Big Andrew and Little Andrew got along well. Evan is in the red shirt and painted rainbows prolificly.


All weddings have their "special" moments. Here is one for the memory book. We prepared two big "slab" pies that served fifty slices. They were unbaked and ready to be frozen (I'll bake them Friday) so I had a certain someone put them in my car to take to my neighbor's freezer (mine are full). That certain someone left the car open while he went inside to get more goods. My dog wanted to go on the trip too so he jumped into the car.......and walked on the pies. The kids then got to enjoy Paw Print Pie Pastries and I got to "enjoy" making more crusts for the pies.


Creative endeavors for the decor and flower girls. The ribbon will drape on the front of the head table.


Today I took an afternoon to spend with the bride and her attendants getting prettied up for the nuptials. I had my first ever manicure (a "French" manicure) and decided I actually really like the results. I think a certain artist I know with long lovely nails should try this out too. Creativity comes in many forms. 

Tomorrow the real wedding mania begins. We will be finishing all the food preparation of a menu for 100 guests and reviewing all the little details. 


Wednesday, January 27, 2016

Drawing Faces, Part One

As mentioned previously, my sister has asked for some help in drawing faces to augment a class she is taking, so I am putting my thoughts down here. This will likely be on-going.

Drawing in General

First, to enjoy the process of drawing, or making any art, one must get rid of the misconceptions.

- Wrong: there is one right way to draw (or sing or bake or dance).
Different ways are for different outcomes, so all or any can be valid. Meaning; your way of doing things can be as good as all the other ways that others do. And, on the other hand, just because you now think that (fill in the blank______) is not "right" or "sophisticated" or worthwhile, doesn't mean you can't learn to appreciate it. This refers to things like representational or non-representational depictions, abstract or realistic, decorative or portrait faces, markers or oil paints, and all those comparisons. Each has its place.


-Wrong: One must not be restricted by rules and limits, or ones creativity will be squelched. Absolutely not. First one must learn the rules of the road, the techniques of the trade, and the moves of the music, before she can make art out of anything. The mind absorbs the knowledge while the hands are practicing the skills, until the two are melded, and then - only then, when the basics are in the automatic mode - can the creative expression of the art come forth. Nobody is going to dance Swan Lake who doesn't know her foot positions or sculpt a Pieta who hasn't chiseled tons of marble, and so on. So you need to study the basics - really well!


Second, you need some basic materials and have them with you at all times and use them a lot! If you are not having to replace pencils and paper stacks and markers on a frequent rotation, you are not doing enough practice. Enough said.
You should have these:
+  Pencils of various hardnesses.
+ An eraser, that you will rarely use
+  A fine tip and a broad tip black marker
+  A white marker/gel pen/paint pen (that covers layers of other media)
+  Colored pencils of good quality, waxed based for top work, or watercolor pencils for underwork
+  Paper, lots of it, any kind, all kinds; it needn't be expensive. Use the blank backs of scrap for your practice pieces.


Nice to have if possible:
+  Acrylic paints and brushes. Craft paints are acceptable for starters.
+  A couple of good brushes, that you maintain scrupulously clean. Rounds in 2 and 10, and a flat
will suffice at first.
+  Tracing paper, carbon paper, or a light box, for transferring patterns
+ Some stencils in forms that you like. You can cut your own by copying patterns that you like onto stiff paper and cutting them out with a craft knife.
+ Rubber stamps or acrylic mounted stamps and ink pad(s) for decorative drawings
+ Any other drawing media, like pastels, paint markers, charcoal pencils, Conte crayons, and so on.

Keep all this handy, so a carrying bag will want to go with you - everywhere.

Always have a sketchbook along. You'll never regret taking the time to use it. These are a few of mine from over the years, from trips to Germany, Ukraine, and Japan, and our own country.

Third, get in your head the bones of what you are doing. If something doesn't have the bones right, nothing will work well. In languages that is the grammar. In music it is the timing and key. In drawing faces, it is the skeleton and muscles. Look at the major forms and learn them. It really helps.

Ya' aut'er know this...

The bones and hollows

Note the planes on the right side of the picture, that become the form on the left side


Fourth, learn the fundamental proportions of the head. This will vary by sex and age (which we will look at later, so concentrate on a young woman's face proportions for now).


Fifth, do not concentrate on how to make the eyes or mouth or any other feature detail, until you have become competent in the major forms. (I have seen many people who have put hours of toil into the most amazingly detailed drawing of meticulous features on a face/horse/figure with wrong overall proportions. As with everything, you need to get the big picture right, then the details will be much easier to pull off - in fact, you sometimes don't even need details and it will still be lovely.

How few marks you need to say something

Practice One - 

Scribble, yes, really. You know that is what you did as a baby, so it is necessary to all good beginnings. Scribbling is a valid way to draw. (I personally do all my drawings in that way.) Some people find it difficult, because they like control, and they will always go back to a single-line type of drawing, which is fine for their temperament; but everyone should practice scribbling anyway. It loosens the muscles, relaxes the body and mind, and allows you to make marks without expecting a masterpiece at the beginning (you can have one at the end - some day).

Process:
Gather paper,
pencil,
a couple of colors in any drawing media (markers are good)
and some relaxing place,
music optional,
good light imperative.

Resource: Do not attempt to do your drawings without resource material. It is like having children teach each other and they all end up ignorant. Something must be added to ones brain to make learning happen. Always use resources: a picture to copy, a model (that person over there who is doing nothing won't mind sitting for you), or yourself in the mirror.
For this practice use a picture of a full front female face (or two or three) and one of a three-quarter view with some shadow.

Method:
Look for awhile at the picture and note the feature placement, shadowed areas, and spacing between parts.
Pick up your drawing implement and look at your paper, envisioning the face on it. Yes, really, do it.
Put the drawing implement (I'll say pencil from now on, but it might be something else you are using)
on the paper and keep it moving and on the paper as you look back and forth from the picture to your drawing. Stop when you want to, but not too soon.


Goal:
You are trying to indicate areas of darkness, some deeper, some mid-tone, with other areas left the white of the paper. This is training your eyes to see lights and darks, your hand to translate from the eyes without belaboring, and your psyche to give yourself breathing room.

Repeat: Always you must repeat. It is the only way to learn. Do many.
Then practice with two or three colors, starting with the lightest, and adding the middle tone over it, but in fewer places, then putting a little of the darkest in some places (you can pick up your marker a couple of times with the darkest, but keep it scribbled.)


Next: Not-scribbled lines in doodles. This will be prettier.

"Seen Today," I'll show you tomorrow, because this is already too long and it is late here.