Tuesday, February 28, 2017

Buncha Art

From Leah:


I recently watched some Bob Ross videos, and was inspired to create a mountain scape. So I did this all off the top of my head with no references! And it only took 2 hours hahaha... but it's only an 8 by 10 canvas. Anyways, I like it.


I have this little blank book of "positive vibe art" that I'm making. Here I made some random made-up letter art and saying. I like this, except for the fact that it is slightly crooked, and some of my letter art skills didn't work out so well. Such as the slightly messed up "Not" in the upper right corner. But overall I think it is pretty good, and I just need more practice. :)

From Sarah:


I'm really sorry I didn't check back with Esther this week. I don't know if she did her cross hatching and stippling yet. We'll try again...

I did enter another Blick contest online. This one has voting again. Neither Anna nor Leah has joined, but they thought about it.

I am so near the completion of my afghan! I've got all the motifs done and put together, so now I just need to figure out what I want to do with the edges.

And I started a new sketch on my phone. I think I'm giving up on the one I shared before. It was maybe too advanced for my skill level. Haha. I'm pretty sure I'll finish this one though... eventually. XD


P.s. My internet connection is the worst it's ever been while I get up this post, so the preview won't load and I can't double check to make sure it looks okay...

Monday, February 27, 2017

Distractions

Sketches

When looking up important stuff it is easy to get on another page and keep looking. It inspired ideas, but took forever.


Sunset

From yesterday's drive home from the mountains.


Now to get to work.

Sunday, February 26, 2017

And Finish

Additions

So, I pulled out some more drawing materials, pastel pencils, Conte crayons, and more colored pencils. Then I put as much more into the candies drawing as the paper would take, which wasn't much. If I were doing it again, I would do an acrylic painting to get more depth to the colors.


Blessings on your Sunday.

Saturday, February 25, 2017

Lettering Catch-up

I realized that I haven't showed my lettering practice for quite awhile.  So I guess I'll do a big catch-up post and show everything I've got.  


I this one I had the idea to letter on one of my gelli prints.  You can't really tell in the photo but the copper color is actually metallic and shiny.  The lettering really doesn't have a enough contrast, though.  Needs more white outlining and such, but the white pen didn't want to behave on the acrylic.


For this one I used a technique where I colored on a smooth piece of plastic with one pen, then ran another pen through that before writing. That adds color to the pen I'm using and makes subtle blending.


I did this one on Valentine's Day so I wanted to make a heart and thought I would try out a banner to go with it. It was a really fun project with a few learning mistakes.  Then I got all done and realized it looks like a tattoo!  Well... that's not what I intended.


This one is written with a purple pen and shading added with blue.


I got a small toned gray sketchbook so that I could paint and draw with white.  This one kind of evolved with no plan, so it has a few design problems, not to mention the fact that I dotted the "n" instead of the i", haha.


Another thing I'm wanting to practice is the use of different letter styles in one piece.   I was pretty happy with this idea, other than some obvious letter-spacing problems.


...And this is what happens when you have a habit of leaving your art out on the kitchen counter and your toddler has a habit of climbing on the counter... sometimes with his mud-boots on.


I really admire loose floral watercolor, especially with ink.  I've been playing with it and here decided to add in my lettering prompt... with poor planning, leading to crowding.  That is one of my most common problems now and I know it could be solved by spending more time with a pencil planning out my designs, and yet I always find myself flying by the seat of my pants.  Oh well, It's all for practice and quantity, not finished works, I guess.


More in the toned sketchbook with some inky flowers:


On this day I tried coloring with my brush pens instead of only writing with them.  I drew the wreath with a Pentel Fude Touch Sign Pen (super awesome pen!  I want to eventually get all the colors...) and colored in and then lettered with Tombow brush pens.


And finally, more loose florals, and poor letter planning.  I really want to figure out the floral thing... mine just aren't quite as fresh and luscious as what I see others are I and want them to be.


And that's it for now.  I might take a break from near-daily practice since I am leaving in a few days to visit family for a week.  I'm taking only the toddler who can still fly in my lap and the days are already packed with plans.  Looking forward to a change of scenery!

Friday, February 24, 2017

Start and Stop

Start

With an illustration finished, I did some other things and came across some candies that caught the light beautifully, so I started drawing them in coloured pencils.


As I proceeded, I needed to go fetch more and different pencils to try to achieve the effects I wanted.


Stop

Eventually I called a halt. I need to get some additional pencils to get the colors I see.


More to follow.


Thursday, February 23, 2017

Little Bits

Color Practice

Today's art was progress on illustrations again, and a bit of journal coloring. While the latter seems mindless, it is actually good practice for color theory. Random doesn't work. One actually needs to put some thought into making a pleasing color map. Here is one, fairly simple. Others will follow.


And here is a gift: hand made in the US, from someone's grandmother's beloved collection, but she has to disperse her things and this was rescued. The arrangement is sealed in acrylic, so you see reflections, but note the detail in the arrangement.


Wednesday, February 22, 2017

Rooster Tales

Introduction 

While we were in Porto, we saw saw, all over the city, colourful rooster images.
Not of this sort....


....but of this sort:


In a handcrafts store I asked what they meant and was given the story. Thus -

Tiny Tale of a Rooster

Once upon a time a long time ago in Portugal somewhere, a man was accused of a dreadful crime. He insisted he was innocent, but to no avail. Eventually he was sentenced to execution, but he asked for one more hearing before the judge. He said, "I did not commit the crime and if I am innocent that rooster in the basket over there will crow." Immediately the rooster crowed. The judge let the man go free, and his story lived happily ever after in the hands of crafters all over the area.

We noticed that, as with all folk tales, there were variations on the story. Some embellishments as to who the man was are added to some versions. One re-telling had the rooster roasted on the table in front of the judge, and the rooster still crowed, which would definitely be more remarkable as a signifier of divine intervention for a special need.


Yes, this one came home with me.


Tuesday, February 21, 2017

Chibi and a Pinch of Something

From Leah:


I felt like drawing a chibi and playing with some color pencils, so I drew my little farm girl from the Harvest Moon video game... The only video game I really enjoy hehehe.


From me:


Esther didn't get around to her cross-hatching and stippling exercises, so we'll try again next time...

And I was a major failure at art goals again this week... However, I DID get to the library this weekend so I could look through my how-to-do-cool-stuff pins for hours and get a start on deciding things... I know, I'm pathetic, but I really think I'm getting somewhere. Slowly but surely.

I found this really cool site where you can find the hexadecimal codes for color schemes. What do you think of this one? Doesn't matter. 'Cause we can't afford to re-decide stuff at this point. Haha, totally joking; I would love to hear what your thoughts are!


And I started starting a bullet journal. I have a few pages numbered and a couple headings. Will work on it some more, of course.


So, yeah! Doing stuff while I'm not doing stuff, and things like that... Yeah. XD I'm trying really hard, I promise. A tiny bit of progress is better than none at all, right?

Monday, February 20, 2017

Felt-Covered Birdhouse Gourds


A little over a week ago we went to a craft party with some friends. The craft we chose may seem a bit odd, but it was fun.  One friend had boxes of birdhouse gourds she had grown and had never gotten around to doing anything with them.  Another friend new how to cover them in wool and felt it.  I have seen these really beautifully done.  With thick wool, they are actually suitable to hang outside as wool felt is somewhat weather-proof.


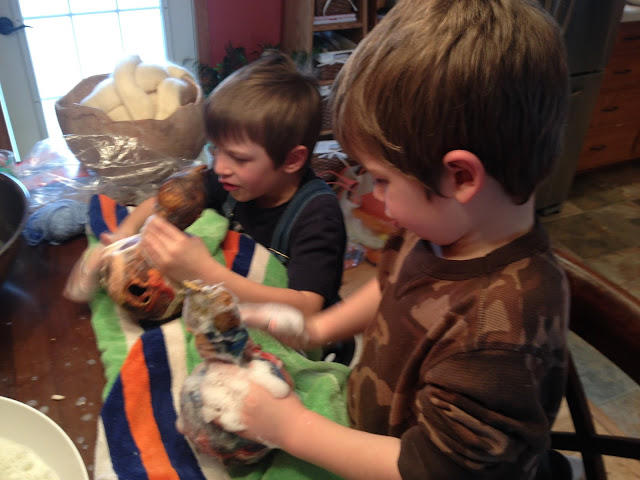
 The gourds had holes in them, but we had to use tools to reach in the holes and get all the seeds out and clean out the insides.  When they were empty, we layered wool all over the outside and held it in place with mod podge or twine.  I didn't realize at first how much wool we actually needed to put on because it shrinks down a lot.  So the kids' gourds didn't really have enough at first and I found myself layering on more wool halfway through the felting process.

(Just a note: in the background of the above photo you can see a broken "bushel" gourd full of white wool.)


Then came the tedious part... lots of rubbing.  We dipped them in hot, soapy water and then "massaged" the wool for about a hundred years until it shrunk down and felted together.  It really tightened up a lot (if it was thickly layered enough) and made a thick covering.

The kids definitely got impatient with this part.  I helped them finish because their attention spans are just a little low for this kind of project.


The above photo shows some of the other gourds done at the party.  Sorry for the poor lighting, but you can somewhat see the fun colors.


Above are the gourds that the kids and I made.  I had to glue the felt down in a few spots on the kids' gourds because they rubbed the felt right off in a few places.


This last one is the one I did by myself after helping the kids.  Rather inexpert, and still too thin on the wool, but a fun first try!


I had never worked with wool before, but this was a really fun and interesting project.  It makes me want to get a supply of colored wool and play with it...


On a slightly different note, here are a couple of "artsy" photos I took with my phone at church yesterday.


The main part of the church is about 150 years old and suffering from structural problems that have caused water damage on the interior.  Heartbreaking, but it makes for some interesting texture.


Sunday, February 19, 2017

Just Flowers

When the day is all this kind of thing...

Polenta

then one enjoys this kind of thing.

First daffodils

Maybe Katie has art?

Blessings on your Sunday.

Friday, February 17, 2017

Felted Flower

Something New

Some new crafting books, and the first flowers peeking out, inspired an attempt at a new technique. Actually I have done this once before long ago, but needed a refresher. I have done some needle felting in the past summers, but this was wet felting, an entirely different process.

Early Primulas

First snowbells

Materials: wool, soap, bubble wrap

Notes

Lay out four layers of pulled wool, fibre direction criss-crossed

Arrange decorative fibres

Add  centre sparkle fibres

Felt lightly into place with felting needle (a special barbed needle, like a fishhook)

Add contrasting fibres around centre

lightly needle into place

With wool pile on bubble wrap, wet and soap the wool with hot water, work in well, but don't scrub.

Roll wool in bubble wrap and start working the packet, lightly at first, rolling and pressing

After some minutes of working, unroll, pull gently into shape, turn the wool, so it doesn't stretch in only one direction. Re-roll and work more.

After working the wool some more, open the packet, shape edges, and turn and flip. Repeat until wool fibres are well interlocked.

Put wool on felting block, bottom side up, and add more color. This probably should have been done in the beginning. Lightly felt with needle to hold, then work in soapy water in bubble wrap.

Let ends remain loose over edges.

Check for interlock by pinching top. If no loose fibres come up, then it is done.

Begin to form cup shape, by gathering bottom and lightly needling.

The work the cup shape over a finger. When formed, rinse well in hot water to get ALL the soap out, then rinse in cold water, re-shape....


... and put in small container to dry in a warm place.


It will get a couple finishing touches when it is dry.